


NEEDLE
1) Self-setting Needles marked “D”, used on the Class 70 are of the following sizes: No.’s 3D, 4D, 5D, 6DT, 7DT, 8D, and No. 8SD, all have straight shanks, flattened at one side and curved blades, the No. 3D being the finest generally used. Special Needles in some of the above mentioned sizes are available for special uses.
2) Set the Needle into the Needle Carrier so that the end of the shank of the Needle is in contact with the Stop Pin 36-6 at the rear of the Needle Carrier, and tighten the Needle Clamp Nut 4-3/16 with the Socket Wrench (44-2), firmly but not unduly. The beveled portion of this Needle Clamp Nut 4-3/16 should be against the recess provided, therefore, in the Needle Carrier Collar.
3) A Needle as large as practical for the work being accomplished should be used, but care should be taken that the slot in the Needle Plate is large enough to accommodate the needle.
NEEDLE CARRIER ASSEMBLY
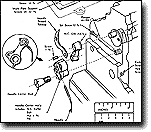 |
4) The Needle Carrier Assembly must be perfectly free to swing upon its stud but must have no lateral movement. This adjustment is accomplished by first loosening the Needle-Carrier-Stud-Set-Screw 12-7/32 which is located in the frame of the machine, directly in back of and below the center of the Needle Carrier Stud, and accessible from the outside rear of the machine. If the loosening of this screw is neglected in a single instance, the machine will be injured.
5) Screw the Needle Carrier Stud in or out very delicately until the proper adjustment is attained and then tighten the Needle-Carrier Stud-Set-Screw 8-7/32 and test the Needle Carrier again.
NEEDLE PLATE
6) The Needle Slot in the Needle Plate must always be large enough to permit the blade of the Needle to pass freely without contact with the Needle Plate. The edges of this slot should be quite square but smooth and only slightly rounded. Be sure there are no burrs or rough places on the chaining finger or working surface of the Needle Plate.
7) The Needle Plate must match the feeding parts.